The foundation of every website
HTML (Hypertext Markup Language) is the fundamental language of the web. Every website you see in your browser is based on HTML code. It structures content, defines hierarchies, and provides search engines and assistive technologies with the information needed to understand and correctly display your content. This is not just a nice-to-have: The WebAIM Million Report 2026 found WCAG errors on 95.9% of the top 1 million homepages – an average of 56 per page.
An analogy for better understanding:
Think of a website like a human body: HTML is the skeleton – it provides the basic structure and form. CSS is the outward appearance like skin, hair, and nails – it makes everything look beautiful and appealing. JavaScript is the muscles and ligaments – they provide movement and interactivity.
Without HTML, the modern web would not be possible. It is the foundation upon which CSS (for design) and JavaScript (for interactivity) are built. Clean, semantic HTML is essential for SEO and accessibility.
In Webflow, HTML is an integral part
Webflow automatically generates HTML code in the background while you design visually. Every element you drag onto the canvas – whether it's a heading, a paragraph, or a section element – is translated into clean HTML code.
The big advantage: You don't have to write HTML manually; you work visually. Webflow handles the technical implementation and ensures that the generated code complies with modern web standards. At the same time, you have full control over the semantic structure of your site.
How to edit HTML in Webflow
In Webflow, you don't edit HTML directly in a code editor, but rather through visual element settings. Each element has specific properties that you can adjust in the right-hand panel.
For advanced customizations, you have several options available:
- Element settings: Change HTML tags and IDs directly in the Element Settings panel
- Custom HTML element: Integrate complex HTML directly into your site with the Embed element
- Site settings custom code: Add custom code to the head or footer in site settings or at the page level
Correct HTML <body> structure in Webflow
A clean HTML structure is the backbone of any professional website. It consists of semantic landmarks that logically organize your page layout, making it understandable for both search engines and screen readers.
The most important structural elements:
- <header>: Header area containing the logo, navigation, and key information
- <nav>: The website's main navigation menu
- <main>: The main content of the page – this is where your sections belong
- <section>: Thematically related content areas within <main>
- <article>: Self-contained content such as blog posts or products
- <aside>: Secondary content such as sidebars or related information
- <footer>: Footer area with copyright, links, and contact information
Typical page structure in Webflow:
A correctly structured Webflow page follows this pattern: The <header> contains the navigation (<nav>). Below that comes the <main>element, which encloses all <section>areas. Optionally, an <aside> can be used for secondary content. At the end is the <footer>.
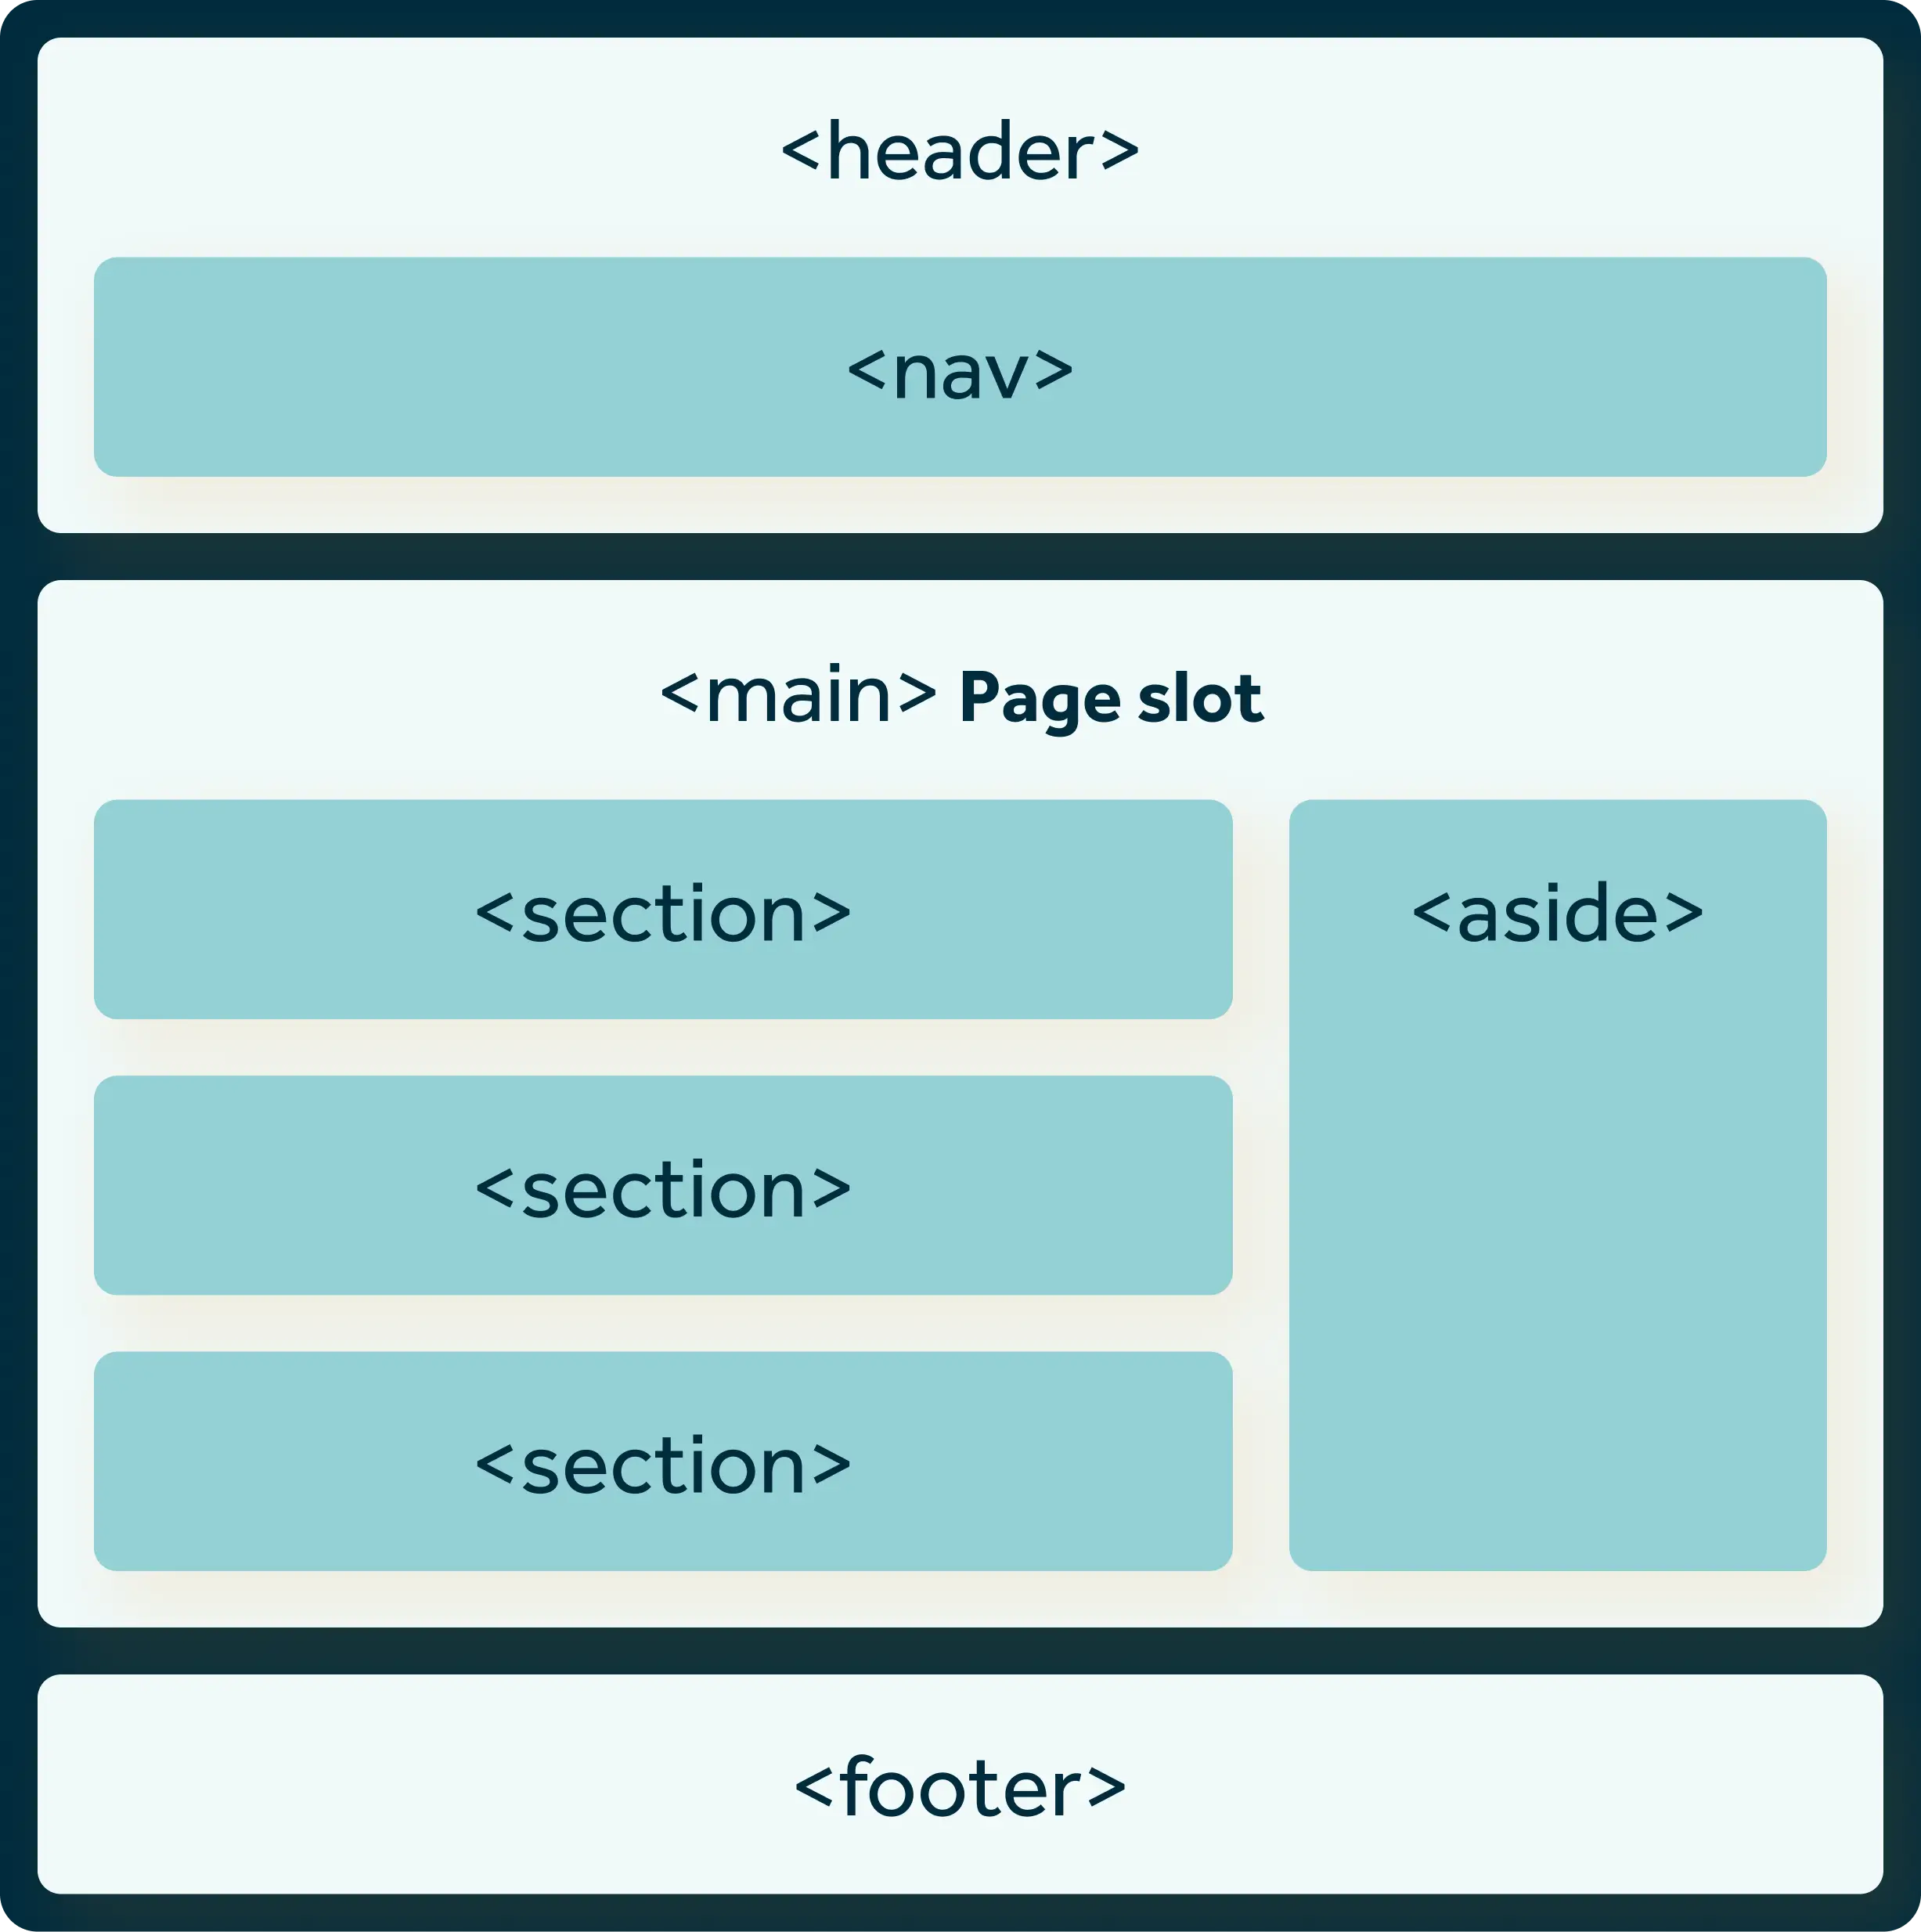
This structure helps search engines understand your page layout and allows screen reader users to navigate efficiently using landmarks.
More on HTML structure: You can find a detailed explanation of HTML layouts and semantic elements at W3Schools HTML Layout.
The ideal heading structure in Webflow
Headings (H1-H6) organize your content hierarchically. A clean heading structure is essential for SEO, accessibility, and modern Answer Engine Optimization (AEO). This isn't just theory: according to the WebAIM Screen Reader Survey , 71.6% of screen reader users navigate primarily via a page's heading hierarchy to find their way around.
Best practices for headings:
- One H1 per page: The H1 describes the main topic of the page
- Logical hierarchy: H2 follows H1, H3 follows H2 – do not skip levels
- Meaningful phrasing: Headings should describe the content precisely
- Integrate keywords: Use relevant search terms naturally in headings
- Not just for design: Choose heading levels based on structure, not visual size
In Webflow, you can control the visual appearance (size, color) via CSS classes while keeping the semantic level (H1-H6) correct.
Hidden headings for better accessibility
Hidden headings are a powerful tool for improving your website's accessibility without compromising the visual design. They allow screen reader users to navigate more effectively, while sighted visitors do not see any additional headings.

When are hidden headings useful?
- Structuring sections: Footer, sidebar, or widget areas receive semantic headings
- Navigation for screen readers: Users can quickly jump to important sections
- Design limitations: When the visual design does not include a visible heading, but the semantic structure is important
Proper implementation in Webflow
Use CSS classes with position: absolute; clip: rect(0,0,0,0); instead of display: none or visibility: hidden, as the latter are ignored by screen readers.
Practical example from my work:
I regularly use hidden headings in the footer of my Webflow projects. There, I insert an H2 element with the text "Footer" that is visible exclusively to screen readers. The implementation:
- Create an H2 element with the text "Footer" in the footer section
- Add a CSS class (e.g., "sr-only" for screen reader only)
- Define the class with position: absolute; left: -10000px; in the custom code
This method significantly improves navigation for screen reader users without disrupting the visual design. Screen readers clearly announce the footer section, and users can jump there directly.
Important warning
Google views hidden headings critically if they are used solely for keyword manipulation. Hidden headings should never be used for keyword stuffing, irrelevant content, or deceptive purposes. Use them exclusively for genuine accessibility purposes.
Semantic tags in Webflow
Semantic HTML5 tags give your code meaning. Instead of just <div>elements, you use descriptive tags like <header>, <nav>, <article> or <footer>.

Webflow supports a variety of semantic tags:
- Section: Use
<section>for thematic areas - Header/Footer: For header and footer areas
- Nav: For navigation elements
- Article: For self-contained content like blog posts
- Aside: For secondary content like sidebars
- Main: For the main content of the page
These tags help search engines and screen readers better understand and index your content.
Complete list of all Webflow HTML5 tags.
The custom HTML element
The Embed element (custom HTML) in Webflow allows you to insert custom HTML code directly into your page. This is useful for:
- Integrating third-party widgets (calendars, forms, etc.)
- Complex structures that cannot be implemented visually
- Schema.org markup for structured data
- Custom JavaScript functionality
- SVG code for custom graphics
- Real HTML buttons instead of links
Important: Custom HTML is only visible after publishing. In the Designer, you will only see a placeholder. Ensure your code is valid and free of security vulnerabilities.
For dynamic content, you can also use CMS fields within Custom HTML to generate personalized code for each collection item.
The difference between links and buttons
A common misconception: The Webflow "Button" element is not a <button> in the HTML sense, but a link (<a>tag) with button styling.
Semantic difference:
- Links (
<a>): Lead to another page or section. They have anhrefattribute and are used for navigation. - Buttons (
<button>): Trigger actions such as opening a modal, submitting a form, or starting a JavaScript function. They do not navigate away from the page.
Why is this important?
- Accessibility: Screen readers announce links and buttons differently. A link says "Link to...", a button says "Button, [action]"
- Semantics: Search engines and browsers correctly understand the function of the element
- Keyboard navigation: Links are activated with
Enter, buttons withEnterandSpace
Practical example: Real buttons with custom HTML
I regularly use the custom HTML element to create real <button>elements when no navigation should take place. Typical use cases:
- Opening/closing modals or overlays
- Switching tabs or accordion sections
- Triggering animations or filtering
- Submitting forms via JavaScript
Code example:
This approach ensures semantically correct HTML and significantly improves your website's accessibility.
Most common HTML mistakes I observe
In my work as a Webflow developer, I repeatedly see the same structural errors that negatively impact accessibility and SEO performance. Here are the four most common mistakes:
1. Footer has a <section> tag instead of a <footer> tag
Many Webflow projects use a <section>element for the footer area. This is semantically incorrect. The footer should always use the <footer>tag so that screen readers and search engines can correctly identify the section as a footer.
Incorrect: <section class="footer">...</section>
Correct: <footer>...</footer>
2. Sections do not use <section> tags, but only <div> tags
The most common mistake of all: content areas are structured as simple <div>-blocks instead of <section>-elements. As a result, the page loses its semantic structure, and screen readers cannot recognize the layout.
Incorrect: <div class="hero">...</div>
Correct: <section class="hero">...</section>
3. The sections are not inside the <main> tag
A critical structural error: the content areas (<section>) are placed directly inside the <body>, without being wrapped by the <main>-element. The <main>-tag is essential for identifying the main content of the page and distinguishing it from the header and footer.
Incorrect:
<body>
  <header>...</header>
  <section>...</section>
  <footer>...</footer>
</body>
Correct:
<body>
  <header>...</header>
  <main>
    <section>...</section>
  </main>
  <footer>...</footer>
</body>
4. The footer is inside the <main> tag instead of outside
Sometimes the <footer> incorrectly placed inside the <main>element. However, the footer belongs on the same level as <header> and <main> – specifically as a direct child of the <body>element.
Incorrect:
<main>
  <section>...</section>
  <footer>...</footer>
</main>
Correct:
<main>
  <section>...</section>
</main>
<footer>...</footer>
If you are unsure whether your Webflow website has these errors, or if you want to build a website from scratch with a clean HTML foundation, I can support you with technically sound Webflow development.
Conclusion
These four errors are easy to avoid if you consciously select the correct HTML tags in Webflow. Use the element settings to convert div blocks into semantic tags such as <section>, <main> and <footer> . This will make your website not only technically more accurate, but also more accessible and SEO-optimized.